Table Of Contents
- Contact And Support
- Quick-start (Combining Meshs and Materials)
- How It Works
- Combining Skinned Meshes
- Customizing Characters
- Texture Packers
- Saving The Combined Mesh As A Prefab
- Baking Meshes Without Creating An Atlas First
- Sharing Settings Between Mesh Bakers
- Recommended Workflow
- Preparing Models For Static/Dynamic Batching (Batch Prefab Baker)
- Preparing Models For Static/Dynamic Batching Legacy Method (Bake Mesh Assets In Place)
- Combining Meshes at Runtime (Bake Texture Atlases Only)
- Multiple Materials
- Options
- Fix Out-Of-Bounds UVs
- Atlas Padding
- Resize Power of 2 Textures
- Blend Non-Texture Properties
- Custom Shader Property Names
- Texture Properties To Ignore
- Lightmapping UVs
- Best Practices
- Texture Arrays
- Creating Custom Group By Filters
- Creating Custom Texture Blenders
- Runtime Use (Advanced)
- FAQ
Contact And Support
You can contact DigitalOpus for support or questions:
- Unity forum Mesh Baker thread (preferred) :http://forum.unity3d.com/threads/mesh-baker-by-digital-opus-released.159258/
- DigitalOpus website: http://digitalopus.ca/
- Email: contact.digitalopus@gmail.com
Quick-start (Combining Meshes and Materials)
This is not the only way to use Mesh Baker but it is a common use case.
- Create a new Mesh Baker object in your scene. If your source objects exceed 64k vertices use a TextureBaker & MultiMeshBaker
- GameObject -> Create Other -> Mesh Baker -> TextureBaker & MeshBaker
- Add objects to combine. For best results, these should use the same shader(s), but they don’t have to. Use the provided tools to make this fast and easy.
- Click ‘Create Empty Assets For Combined Material’. This will create material assets for the combined material(s) and also an MB2_TextureBakeResults asset that contains information mapping materials to UV rectangles in the atlases.
- Select shader on Combined Mesh Material. Mesh Baker tries to duplicate the material settings on the first object in the list of objects to combine. Mesh Baker will build a texture atlas for each texture property in this shader (main, bump, specular etc…).
- Set any options then click ‘Bake Materials into a Combined Material’.
- Look at warnings / errors in the console. Decide if action needs to be taken. Look at the combined material asset in the inspector to see that the generated atlases look correct. You may need to adjust non-texture properties in the combined material shader(s) to match the source material(s).
- If your meshes are distributed throughout the scene or clustered you may want to use the MB3_ClusterGrouper to group your meshes into multiple combined meshes. This will create several MB3_MeshBaker components.
- In the MB3_MeshBaker component click ‘Bake’. This will create the combined mesh and a new game object that uses it. The combined mesh is an instance (not an asset) so it can’t be used in a prefab. If you want to use the combined mesh in a prefab then select “output” -> “bake into prefab” (Create a prefab with an empty GameObject and drag it to the resultPrefab slot). The mesh will be saved as an asset and assigned to the provided prefab.
- (optional) Disable renderers in source objects.
Once this has been done, you can remove the Mesh Baker object from the scene or keep it around for easy re-baking. If anything changes in any of your source models or textures, just bake again to regenerate the combined mesh and texture atlases.
How It Works
Mesh Baker consists of two core components. A MB3_TextureBaker component and a MB3_MeshBaker component. These components can be used together or separately.
The MB3_TextureBaker creates atlas assets and a special Texture Bake Result asset that maps the source materials to UV rectangles in the atlases. Once this has been created then any mesh that uses the source materials can be added to the combined mesh, even meshes that were not included in the original texture bake.
The user must provide:
- A Combined Mesh Material and set the shader on this material
- A Texture Bake Result (MB2_TextureBakeResults)
- A list of game objects with MeshRenderers or SkinnedMeshRenderers to be combined
MB3_TextureBaker has a list of names of common texture properties that it looks for in the Combined Mesh Material shader. An atlas will be created for each texture property found in this shader. If the shader contains texture properties with non-standard names these should be added to the list of “Custom Shader Property Names”. For each object to be combined, the materials on that object are collected and the textures in those materials are added to the appropriate atlases. If a material does not have a required texture property or a texture is not assigned for a property then Mesh Baker makes a calculated guess at the correct color for the atlas based on the name of the texture property and other properties that may be present. For example, if an Emission texture slot is empty Mesh Baker will use the EmissionColor if it is present. If a source material has extra texture properties not included in the Combined Mesh Material shader, then these are ignored. If a material uses tiling then that tiling will be baked into the atlas up to the “maximum tiling bake size”. Textures that are used more than once on the source objects will only be included once in the atlas provided they use the same tiling and offset.
The generated atlases are added to the Texture Bake Result (MB2_TextureBakeResults) asset. This asset also contains information mapping source materials to their texture locations (UV rectangles) in the atlases.
The Texture Bake Result asset can be used in other scenes or even exported with the combined material and atlases and used in another project.
The user then uses the MB3_MeshBaker component to combine the meshes. This can step can happen in a different scene or a different project as long as the user has generated a Texture Bake Result asset. The user must provide:
- A Texture Bake Result (MB2_TextureBakeResults) asset. This is usually the same as the one used by the MB3_TextureBaker component.
- A list of objects to be combined (game objects or prefabs with MeshRenderers or SkinnedMeshRenderer components). This is usually the same as the list of objects used to build the atlases, however, it can include objects not on that list as long as all materials on included objects have been baked into the Texture Bake Result.
As each mesh in the list of objects to be combined is added, mesh baker uses its materials to look up the correct UV rectangle in the MB2_TextureBakeResults object. The UVs in the mesh to be added are scaled to fit this UV rectangle. If “fix out of bounds UVs” was checked in the MB3_TextureBaker component than UVs are scaled to be in the range 0,0 .. 1,1. All submeshes on the source objects are collapsed into a single mesh unless the user is using the multiple combined materials option in which case Mesh Baker creates submeshes.
The MB3_MeshBaker component internally keeps track of the objects in the combined mesh so it is possible to quickly add and remove objects at runtime.
What is done with the combined mesh depends on the “output” option selected.
- Bake into scene object: A new game object is created in this scene and a MeshRenderer or SkinnedMeshRenderer is added. The mesh is an instance so the created game object won’t work as a prefab.
- Bake into prefab: The user must provide a prefab containing a game object. The mesh is saved as an asset and it is added to the prefab.
- Bake meshes in place: See the section Preparing Models For Static/Dynamic Batching (Bake Mesh Assets In Place)
Combining Skinned Meshes
Combining SkinnedMeshRenderers is no different than combining ordinary meshes except that the “Render” field should be set to “SkinnedMeshRenderer”. You can even combine a group of MeshRenderer objects into a single skinned mesh.
There are some special considerations when combining meshes into SkinnedMeshRender:
- You must leave the original SkinnedMeshRender bones in the scene, since the original bones are used by the animations and the combined SkinnedMeshRender object. Disable the SkinnedMeshRender component on the source objects.
- If animations stop working after combining
-
- Check the “culling type” on the animation. Unity is probably culling the animation:
- Set the animation component culling type to “Based On Clip Bounds” or “Always animate”. Avoid “based on renderers” since the original renderer is disabled.
- Mesh Baker includes a component for culling out of bound animations.
- Check the “culling type” on the animation. Unity is probably culling the animation:
- Alternatively you can move the bones underneath the Animator component in the hierarchy.
-
- You may need to update the “bounds” field of the combined skinned mesh. This bounds is NOT updated automatically. Unity culls a skinned meshes if its bounds are outside the camera frustum. If you have combined several skinned meshes that can move some unpredictable distance apart then you will need to update the bounds of the skinned mesh. Mesh Baker includes two scripts that can be attached to your combined mesh that will update the bounds. You can also call the UpdateSkinnedMeshBounds methods on the mesh baker components if these have been left in the scene. Updating the bounds every frame is expensive so consider carefully if the bounds could be static or adjusted infrequently THERE IS A BUG IN UNITY SET AND UNSET THE updateWhenOffscreen FIELD OR THE UPDATED RENDER BOUNDS VALUE IS IGNORED:
- MB2_UpdateSkinnedMeshBoundsFromBones
- MB2_UpdateSkinnedMeshBoundsFromBounds
- SkinnedMeshRender objects to be combined do not need to share a common parent.
- You can combine MeshRenderer objects with SkinnedMeshRenderers. This is useful for adding hats, weapons, armor etc. to skinned characters. The transform that the MeshRenderer is attached to becomes a bone.
- Parent the MeshRenderer object to the appropriate bone (for example a skinned character’s hand)
- Position, rotate and scale it correctly
- Include it in the list of objects to be combined
- If you want to make a prefab out of the combined SkinnedMeshRenderer, then all the bones (source objects) must be included in the prefab. See the FAQ for the procedure for this.
- You can customize characters by adding or removing swords, weapons, armour, etc. while the game is playing. To do so, you will need to bake all the textures that could possibly be added into the combined material. A subset of the objects should be baked into the combined mesh. Uncheck the Objects To Be Combined -> “Same As Texture Baker” field. Then add this subset of objects that you want to combine in the mesh.
- MeshRenderers (eg. sword) that are combined will add an extra bone to the skinned mesh. If you don’t want the extra bone then enable “No Extra Bones For MeshRenderers” , in which case the MeshRenderer will be merged into its parent (a sword will become part of the hand).
Skinned Mesh Blend Shapes
Skinned meshes with Blend Shapes can be combined in Unity 5.2 and higher. If more than one source mesh has blend shapes, then the indices of the blend shapes and names of the blend shapes in the combined mesh will not match the indices and names in the source meshes. When blend shapes are included in the bake, a MB_BlendShape2CombinedMap component is added to the combined skinned mesh. This component can be used to build a dictionary for mapping the source mesh blend shapes to the target mesh blend shapes.
You may be combining several body part skinned meshes together into a single character. The different source skinned meshes may have blend shapes some of which have the same names as other skinned meshes. If you want all blend shapes with the same names merged (instead having them renamed and using the MB_BlendShape2CombinedMap), then enable “Merge Blend Shapes With The Same Names”
Customizing Characters
It is possible to create characters by mixing and matching skinned mesh body and clothing parts. For example a character could have different clothing (shirts, sweaters, coats, swimsuits, gloves etc..) and different body parts (whole and damaged versions) of body parts etc… These can be baked into a single skinned mesh. There are some considerations to keep in mind when creating these parts and Mesh Baker includes a script to help with the process.
- Vertices at the joins between parts (eg. a hand and arm). must have the same position, boneweight, normal and tangent.
- All parts must be skinned to the same skeleton. Don’t duplicate the skeleton for different outfits.
Matching normals can be particularly difficult because some modelers like Blender do not let the user edit the normal directly. Normals are calculated based on neighboring faces and edges. This usually results in different normals for the two parts sharing a seam, even if the vertices were copied directly from one mesh to another.
Mesh Baker provides a script (MB3_BoneWeightCopier) for copying position, boneweight, normal and tangent from a master mesh to the other meshes. An imported mesh can be processed in Unity after import to ensure that all meshes share the vertex properties at the joins.
To use the script create a new MB3_BoneWeightCopier object (GameObject -> Create Other -> Mesh Baker -> Bone Weight Copier. Follow the instructions in the inspector.
Texture Packers
Mesh Baker includes several different Texture Packers:
Unity Texture Packer
This is the texture packer that is part of the Unity API. It can run out of memory (crashing Unity) when packing many large textures.
Mesh Baker Texture Packer
This is the most full featured texture packer. It implements all Mesh Baker features.
Mesh Baker Texture Packer Fast
This is similar to the Mesh Baker Texture Packer but it is designed to be used at runtime. It packs textures using render textures on the GPU. This is faster than the regular Mesh Baker Texture Packer and does not require that textures be uncompressed. However it does not copy textures with perfect fidelity, and does not implement all features.
Mesh Baker Texture Packer Vertical
Some meshes (eg. tree trunks) use a lot of tiling textures that are repeated many times vertically up the trunk of the tree. Baking this tiling would exceed the maximum atlas size and atlas quality would be poor. It would normally be impossible to pack these textures together effectively. However it is still possible to pack the textures in an atlas if the textures are packed side by side and stretch to the top and bottom of the atlas texture. Meshes that use the atlas can tile in the vertical direction but not the horizontal direction. This is what the Texture Packer: Mesh Baker Texture Packer Vertical does. Note that it is still possible to use the “Consider UVs” feature. UV tiling in the horizontal direction is baked into the atlas. UV tiling in the vertical direction is left alone.
Mesh Baker Texture Packer Horizontal
This is the same as Mesh Baker Texture Packer Vertical but the directions are reversed.
Saving The Combined Mesh As A Prefab
The Combined Mesh can be saved as a project asset and used in a Prefab. Do the following:
- MB3_MeshBaker=>Output should be “Bake Into Prefab”
- Assign a prefab asset of a GameObject to the MB3_MeshBaker=> Combined Mesh Prefab field.
When you “Bake” the prefab will be re-built to contain the combined mesh.
Note that combining Skinned Mesh Renderers into a prefab requires some special considerations because the bones (Transforms) used by the source renderers are also used to deform the combined mesh. These bone-transforms and any animators or scripts that are used to move them need to be copied to the Combined Mesh Prefab. As of version 29.1 Mesh Baker will do this copying automatically. If the source renderers in the list of Objects To Be Combined have animators or scripts that move them, then the source renderer should be part of a scene-object-prefab-instance. The root of the scene-object-prefab-instance will be duplicated and moved to the output prefab.
Baking Meshes Without Creating An Atlas First
You can ignore the MB3_TextureBaker. Simply add your objects to the MB3_MeshBaker and bake. If source objects used different materials they will be added to different submeshes.
Sharing Settings Between Mesh Bakers
Settings can be saved as an asset and shared by many Mesh Bakers. This also provides a mechanism for copying settings between Mesh Bakers and Multi Mesh Bakers.
To create a MeshBakerSettings asset do one of the following:
- Choose Create Mesh Baker Settings Asset from the context menu of a MB3_MeshBaker component
- Right click in the project window and choose Create -> Mesh Baker->Mesh Baker Settings
A Mesh Baker Settings asset can be assigned to the Use Shared Settings field of a Mesh Baker, Multi Mesh Baker or Mesh Baker Grouper.
Settings can be copied between Mesh Bakers and Multi Mesh Bakers by using the Copy commands in the inspector context menu dropdown (little gear in the top right corner).
Recommended Workflow
To use Mesh Baker quickly and efficiently, it is highly recommended that you use the “Tools For Adding Objects”. These can save you hours of work.
- Add a Mesh Baker object to your scene.
- Click “Open Tools For Adding Objects” and then “List Shaders In Scene”. Use the Group By fields to organize this list. You can create a MaterialBaker/MeshBaker object for each group by clicking the button beside the group. If there is a Group By filter that you would like but is not provided it is easy to create your own custom group by filters. See the section later in this manual.
- If you want to add objects to an existing Mesh or Texture Baker you can use the “Search For Meshes To Add” tab.
- Drag the target Mesh or Texture Baker to the “Target to add objects to” slot.
- Select objects in the hierarchy and click “Add Selected Meshes”. Mesh Baker crawls through the selected objects (including their children) and adds objects with Renderers attached. It applies the filters as it goes.
- Bake the materials and meshes.
- Keep the Mesh Baker objects around. You can disable them if you like. If any of your source objects change, then just re-bake.
If the source objects are have Colliders or have scripts on them, you may want to keep the source objects in the scene with the render components disabled.
Preparing Models For Static/Dynamic Batching (Batch Prefab Baker) AKA Combining Textures Without Combining Meshes
Unity’s static/dynamic batching only works with meshes that use the same material. If you have meshes that use different materials, the Batch Prefab Baker feature can create a combined material, and copies of your prefabs that use the combined material. The duplicate prefabs (using the combined material) will now be batched by Unity.
- (Optional) Open an empty scene for creating the prefabs.
- Create a Batch Prefab Baker from GameObject -> Create Other -> Mesh Baker -> Batch Prefab Baker.
- Bake the materials together on the prefabs using the MB3_TextureBaker component on the Batch Prefab Baker. You may need to create instances of the prefabs in your scene to do this step.
- On the Batch Prefab Baker click “Populate Prefab Rows From Texture Baker“. Or Optionally drag source prefab assets to the ‘Source Prefab‘ slots. These need to be project assets NOT scene objects. Renderers do not need to be in the root of the prefab. There can be more than one renderer in each prefab.
- Assign a folder where output prefabs will be saved. To do this click the “Browse For Output Folder“.
- Create empty result prefabs by clicking the button “Create Empty Result Prefabs“. Create some prefab assets of empty game objects and drag them to the ‘Result Prefab‘ slots.
- Click Batch Bake Prefabs.
Replacing prefab instances in your scene
You likely have a scene full of source prefab instances that you would like to replace with your new optimized prefabs. This can be done with the “Replace Prefabs In Scene Window“. Open the window by clicking the button “Open Replace Prefabs In Scene Window”. Using this window you can replace prefab instances in the scene.
The window will copy GameObject and Component settings from the source to the target prefab instances as they are copied. In order for copying settings to work, the source and target prefabs must have the same structure.
Preparing Models For Static/Dynamic Batching Legacy Method (Bake Mesh Assets In Place)
This is an older method for preparing models for static/dynamic batching. It has more steps but is more flexible so it may work in cases where the previous method does not.
- Create a new Mesh Baker object in your scene under the Game.
- GameObject -> Create Other -> Mesh Baker -> TextureBaker & MeshBaker
- Create combined material asset(s).
- Select shader on result material(s). Mesh Baker will build a texture atlas for each texture property in these shaders.
- Add objects to combine. These can be prefabs. If you use scene objects, the translation/rotation/scaling will be baked into the saved meshes (which may not be what you want). You probably want the prefab at position (0,0,0), rotation (0,0,0) scale (1,1,1).
- Set any options, then click ‘Bake Materials into a Combined Material’.
- Look at warnings / errors in the console. Decide if action needs to be taken.
- Set the output to “bakeAssetsInPlace”.
- Choose a directory where the generated meshes will be saved.
- Click “bake”. This will create a new mesh asset for every mesh in the list of objects to combine. Look in the console for a list of all the meshes that were created.
- For each prefab in the list of objects to combine.
- Replace the mesh with the generated mesh
- Replace the material(s) with the combined material(s)
Combining Meshes at Runtime (Bake Texture Atlases Only)
Lightmapping
Unity 5
Unity 5 uses a completely different lightmapping system. The best documentation I have found on this is here https://goo.gl/bHsCyq.
- UV is used for color map, normal map, etc..
- UV2 is used (in a modified form) for realtime and baked GI (UV is used if UV2 is not present)
- UV3 can be optionally used for secondary detail maps or anything else
- UV4 can be optionally used for secondary detail maps or anything else
For realtime and baked GI, UV2 is repacked and stored in Renderer.additionalVertexStreams. It is not possible to preserve_existing_lightmapping for Baked GI. The preserve_existing_lightmapping does not work in Unity 5.
The safest approach is to generate_new_UV2 layout or copy_uv2_unchanged_to_separate_rects and re-bake the lightmaps after the combined mesh has been generated. Note that if no UV2 is present in the combined mesh Unity will try to use the UV channel when baking the lightmaps. This is a problem if there are overlapping islands in the UV layout. There are some important settings in the lighting panel that affect the quality of the lightmapping:
- Ensure the combined mesh is marked “Lightmap Static” in the object tab
- Lightmap Scale can affect quality. If it is set too large look for a warning “Objects size in lightmap has reached maximum atlas size”. Reduce the scale until this warning does not appear.
- In the Lighting -> Scenes tab experiment with the Baked Resolution and Baked Padding values.
- Unity 5 does not like lightmapping objects that are very large scale in the scene. The performance and quality are poor. Consider baking parts of the scene that are close together.
- If using there are fuzzy spots on the lightmap after baking, try increasing the lightmap padding or the lightmap resolution.
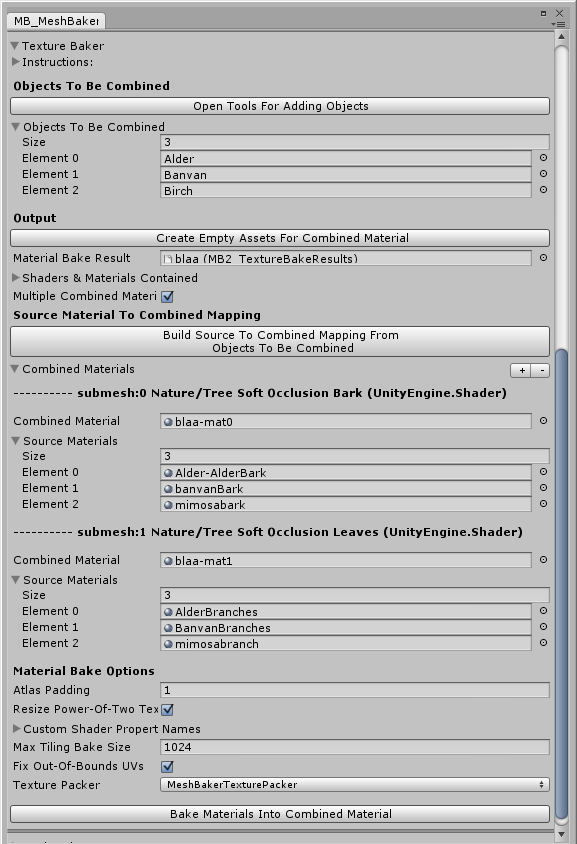
Multiple Materials:
Some meshes use submeshes. A submesh is nothing more than an extra list of triangles in a mesh so that an extra material can be applied. A mesh can have a different material for every list of triangles (submesh) it contains.
By default Mesh Baker will collapse all source submeshes into a single submesh in the combined mesh. Mesh Baker treats each submesh as if it were its own mesh. Think of each submesh as its own entry in the the list of Objects To Be Combined. This is often preferable to preserving the submeshes as it results in fewer draw calls.
The Multiple Combined Materials feature allows you to create a combined mesh with submeshes and gives you fine grained control over how the source submeshes map to the submeshes in the combined mesh. To enable the feature check “Multiple Combined Materials.
If you are combining tree creator trees. There are additional tips in the FAQ.
To use this feature you must define a mapping so that Mesh Baker knows which submesh in the combined mesh a source submesh should map to. Mesh Baker uses the Material that is on a submesh in the mapping definition. Consider this trees example:

We want the source submeshes with bark materials mapped into one submesh in the combined mesh, and the all the submeshes with leaf materials combined into a different submesh in the combined mesh.
- Add your objects to combine. If you do this first then mesh baker can examine the shaders on these objects and try to generate the source material to combined material mappings automatically for you.
- Click “Create Empty Assets For Combined Material”.
- Click the “Multiple Combined Materials” checkbox. Notice that the “Combined Material” field is replaced by a list of materials.
- Try the “Build Source To Combined Mapping From Objects To Combine” button. Look at the results. You can modify it as desired.
- Click the “+” or “-” buttons to add or remove mappings.
- Drag material assets to the slots in the mapping list.
Here is how the inspector should look in the example given above.
Options
Consider Mesh UVs (was Fix Out-Of-Bounds UVs)
What It Does: Some models have UVs outside the range 0..1. This produces the same result as tiling. These meshes are hard to combine, because the tiling will pick up neighboring textures in the atlases. Fix Out-Of-Bounds UVs will scale the UVs in the model so that they fit inside the 0..1 range. Tiling will be baked into the combined texture.
Some source models already use an atlas and only use a tiny piece of the source texture. It would be wasteful to copy the entire source atlas into another atlas. This feature will only copy the parts of the source texture that are used by the source mesh UVs.
When To Use It: The “List Shaders In Scene” report will tell you if you have UVs outside the range 0..1 on your models. Fix Out-Of-Bounds UVs is often the only way to have tiling models share textures in an atlas. Be aware that using this feature is sometimes not the best choice. For example, consider a castle model with many different parts (towers, walls, buttresses, etc). Each part tiles the same tiny brick texture. These can all be combined together (with tiling) provided the brick texture is the only texture in the atlas. This is probably a better choice than baking the tiling on each piece into one huge atlas.
Atlas Padding
What It Does: Adds a border around the textures in your atlas so that adjacent textures don’t bleed into each other.
When To Use It: Normally, a value of 1 or 2 pixels produces good results. If your textures to be combined already have a clear border, you could set the border to 0.
Texture Packer
What It Does: Mesh Baker can use three different texture packing algorithms.
- Unity’s Pack Textures always packs textures into an atlas that has power-of-two dimensions. This can lead to wasted space in atlases. This texture packer can also generate MissingReferenceExceptions when combing many textures into a large atlas. If textures are too large for the platform then they will be resized.
- Mesh Baker Texture Packer A custom texture packer created for Mesh Baker that handles memory better. If textures are too large for the platform then they will be resized.
- Mesh Baker Texture Packer Fast Same as the Mesh Baker Texture Packer but uses a RenderTexture to pack the textures using the GPU instead of the CPU. This is faster and has the bonus that source textures do not need to be in uncompressed format. Great for runtime texture baking. It requires Unity 5 or Unity 4 Pro. If textures are too large for the platform then they will be resized. Not all features are supported by this packer.
- Mesh Baker Texture Packer Horizontal This stacks images in atlas vertically. This makes it possible to have images that use out of bounds UVs on the X axis share an atlas. It is best not to use ‘Consider Mesh UVs’ when using this feature.
- Mesh Baker Texture Packer Vertical This stacks images in atlas horizontally. This makes it possible to have images that use out of bounds UVs on the Y axis share an atlas. It is best not to use ‘Consider Mesh UVs’ when using this feature.
Resize Power of 2 Textures
What It Does: If checked, this option shrinks power-of-two textures so they have a border of “atlas padding” around them. For example, a 128×512 texture with 2-pixel padding is shrunk by 4 pixels, so that it is 128×512 after padding. This only affects power-of-two textures (32, 64, 128, 512)
When To Use It: You will usually want to leave this feature on if using Unity’s Texture Packer. It is not necessary if using Mesh Baker’s texture packer. This option can dramatically reduce wasted space in the atlases. Unity’s texture packer likes to jump by powers of two (eg.. 512×512 jumps to 512×1024). If you are combing two source textures that are 512×512 each then, after padding (514×514) the atlas will jump to 1024×2048. If you have textures that you really do not want resized, then turn this feature off or set the padding to 0.
Blend Non-Texture Properties
What It Does: If checked, Mesh Baker will attempt to blend non-texture properties such as _Color, _Glossiness, _Emission with the texture when a texture is added to an atlas. Objects with different non-texture properties will be written to different parts of the atlas even if they use the same texture. This feature requires that a TextureBlender script exists for the result material shader. TextureBlenders are easy to write. See the section later in this manual for details on how to write a TextureBlender.
When To Use It: Use this option if you are using properties such as _Color to tint different materials different colors and want this preserved in the result material.
Custom Shader Property Names
What It Does: Mesh Baker looks at the properties in the combined mesh shader to decide which atlases to build. It has a list of built-in texture property names to look for: “_MainTex”, “_BumpMap”, “_BumpSpecMap”, “_DecalTex”, “_Detail”, “_GlossMap”, “_Illum”, “_LightTextureB0”, “_ParallaxMap”,”_ShadowOffset”, “_TranslucencyMap”. If any of these are present, then it builds an atlas for that texture property.
When To Use It: If you are using a custom shader, then it may include a texture property that is not on this list. You can include this property by typing its name in the list of Custom Shader Property Names. Do not type the name that is visible in the inspector. You will need to open the shader and look at the list of properties and use the name from there.
Texture Properties To Ignore
What it Does: Atlases will NOT be created for shader property names on this list.
When To Use It: Mesh Baker helps to create shared materials by combining textures into atlases. This technique works for texture properties that use UVs to map Textures onto triangles. Some shaders have texture properties that do NOT use UVs map the texture. An example is a Cartoon cell shader color ramp. Use this setting for texture properties that do not use UVs when sampling the texture in the shader.
Lightmapping UVs:
Instructs Mesh Baker what to do with the UV2 channel in the combined mesh. The UV2 channel in Unity is reserved for lightmapping.
- ignore_UV2: No UV2 channel will be generated in the combined mesh.
- copy_UV2_unchanged: Use this if all your source meshes use UV2 for a purpose other than lightmapping and you want these values preserved in the combined mesh.
- copy_UV2_unchanged_to_separate_rects: Use this if your source meshes have a custom UV2 layout that you want to preserve in the combined mesh and use for lightmap baking. Each source mesh will have its UV2 layout copied to a separate place in the combined UV2 layout. The source UV2s will be scaled according to the size of the meshes in the scene.
- preserve_current_lightmapping: This feature does not work in Unity 5 Use this if your source meshes are already lightmapped and you want to preserve the lightmap. All source meshes must use the same lightmap index. NOTE: Lightmapping in Unity 5 is very different from Unity 4 and this feature should be considered experimental in Unity 5.
- generate_new_uv2_layout (RECOMMENDED APPROACH): Use this if you want to generate lightmaps using the combined mesh after it has been generated. Make sure that the combined scene object is ‘static’ and ‘enabled’ and that source objects are disabled before baking lightmaps. This is the most robust approach for lightmapping.
The MultiMeshBaker Component
Use this component if the number of vertices in your source objects exceeds 64k. It will create as many combined meshes as necessary to accommodate the objects.
Best Practices
For best results meshes and materials should:
- Use the same shader
- Have all textures present
- Have all textures in a single material be the same size
The console is your friend. Look there for warnings and other information. Click on the line that says “Report” to see a list of all the textures that were combined and the objects they are on. This is useful for tracking down problems.
Use the “List Shaders In Scene” report to plan what to combine in your scene.
Experiment. Try different options to see what produces the best results.
If textures are missing, a default empty texture will be created. If textures are different sizes, they will be copied and resized to the same size as the largest texture in each material.
Texture Arrays
Texture Arrays are an alternative to Texture Atlases. Mesh Baker can produce both Atlases and Texture Arrays. Because this topic is large a separate Manual has been generated describing how to use Texture Arrays. It can be found in the Docs folder.
Creating Custom Group By Filters
You can easily create your own Group By filters. The easiest way to do this is to duplicate one of the Group By scripts:
- Search the Project tab for “GroupBy”
- Select and duplicate one of the GroupBy scripts
- Rename the script and the name of the class within the script. The script may reside anywhere in the assets folder as long as it is contained within a folder called “Editor”.
- Modify the script to filter the way you want. The file MB3_SearchFilter contains the interface definition and the GameObjectFilterInfo class which contains useful information on which to base your filter.
- Mesh Baker will automatically find your TextureBlender
Creating Custom Texture Blenders
You can easily create TextureBlenders for your shaders. The easiest way to do this is to duplicate one of the existing TextureBlender scripts:
- Search the Project tab for “TextureBlender”
- Select and duplicate one of the TextureBlender scripts
- Rename the script and the name of the class within the script. The script may reside anywhere in the assets folder as long as it is contained within a folder called “Editor”.
- Modify the script to work with the properties that are used by the shader.
- Mesh Baker will automatically find your TextureBlender.
Runtime Use (Advanced)
If you want to add, delete or move objects in a combined mesh, then you will need to use the runtime API.
How it works:
- When a MB3_TextureBaker creates combined materials, it creates an MB_TextureBakeResult asset which contains a mapping of materials to UV rectangles in the atlases. It is recommended to do this step in the editor since it is slow and only works with uncompressed textures. The MB3_TextureBaker can be removed from the scene after it has baked the combined material. The texture baking pipeline can be run as a coroutine to prevent the game from freezing while textures bake. Textures will be baked in the background.
- A MB3_MeshBaker component is added to the scene and the “Texture Bake Result” field is set to the MB_TextureBakeResult asset created in the previous step.
- At runtime, when an object is added, MB3_MeshBaker uses the object’s material to look up the UV Rect. The mesh uvs are adjusted as the object is being added to the combined mesh.
- The API has methods AddDeleteGameObject() and UpdateGameObject() for adding and deleting and updating the game objects. Apply() changes to the mesh.
Typical Use Pattern:
The developer decides which objects he would like to be able to combine at runtime in each Mesh Baker instance.
-
- Create a “Combine Materials Only Baker”
- Bake a Combined Material as per instructions described in previous sections
- Add a MB3_MeshBaker component to the scene either from the GameObject menu or create an empty Game Object and add the script. The MB3_TextureBaker component won’t be needed.
- Set the “Texture Bake Result” field to the asset generated in the texture bake.
using UnityEngine;
using System.Collections;

public class MB_Example : MonoBehaviour {

  public MB3_MeshBaker meshbaker;
  public GameObject prefab;

  GameObject go1, go2;

  void Start(){
    // Instantiate some prefabs
    go1 = (GameObject) Instantiate(prefab);
    go1.transform.position = new Vector3(5f,5f,5f);

    // Can use a prefab not baked into the materials to combine
    // as long as it uses a material that has been baked
    go2 = (GameObject) Instantiate(prefab);
    go1.transform.position = new Vector3(5f,5f,5f);

    //Add the objects to the combined mesh
    GameObject[] objsToCombine = new GameObject[2] {go1,go2};
    meshbaker.AddDeleteGameObjects(objsToCombine, null);

    //apply the changes we made this can be slow. See docs
    meshbaker.ApplyAll();
  }

  void Update () {
    go1.transform.position =
      new Vector3(5f,5f*Mathf.Sin(Time.time),5f);
    go2.transform.position =
      new Vector3(5f,5f, 5f*Mathf.Cos(Time.time));
    GameObject[] objsToUpdate = new GameObject[2] {go1,go2};
    meshbaker.UpdateGameObjects(objsToUpdate);
  }

  void LateUpdate(){
    //Apply, after this and other scripts have made changes
    //Only want to call this once per frame since it is slow
	//Only change verts since it is slow to update everything
    meshbaker.Apply(false,true,false,
                    false,false,false,false,false);
  }
}
Performance Considerations
- Try to call AddDeleteGameObjects as few times as possible in a frame. It takes almost the same amount of time to add one object as many so batch the adds and deletes. It is good practice to do this in LateUpdate after collecting objects to add and delete.
- You can delete and add the same game object in a single AddDeleteGameObjects call. This is useful if you want to change the material on an object or you have changed the mesh in an objects MeshFilter.
- Apply takes approximately the same amount of time to execute Apply as AddDeleteGameObjects.
- There is a roughly linear relationship between the number of channels and time to AddDeleteGameObjects/Apply. So a mesh with vertices, colors will bake twice as fast as one with vertices, normals, tangents, uvs.
- Update is about 3x as fast as AddDeleteGameObjects so if you want just want to move objects around in the combined mesh use Update instead of AddDeleteGameObjects. It also puts a much lower load on the garbage collector.
- If you want to move objects around almost every frame then consider baking into a SkinnedMeshRenderer. It is much faster than Update.
- There are effectively three copies of each mesh in memory when a mesh is baked (the source mesh, the combined mesh and internal buffers of the MeshBaker object) If you don’t intend to modify a combined mesh then consider deleting the source meshes and the MeshBaker object from the scene:
Baking Materials at Runtime
Baking textures at runtime does incur a serious performance hit. Expect baking to take 1-20 seconds or longer to bake atlases at runtime. If possible use the “Mesh Baker Texture Packer Fast” option. It does not require textures to be in uncompressed format.
For building atlases at runtime it is essential that:
- textures be in trucolor/RBGA32 format (Not necessary if using the Mesh Baker Texture Packer Fast)
- textures have read flag set (Not necessary if using the Mesh Baker Texture Packer Fast)
Try to avoid resizing and tiling. It can reduce bake time by 80%
- build padding into textures so you don’t have to pad.
- don’t use padding when creating atlases
- don’t use tiled materials
If you are having problems look at the Debug Log on the device
Here is a simple example:
using UnityEngine;
using System.Collections;

public class BakeTexturesAtRuntime : MonoBehaviour {
	public GameObject target;
	float elapsedTime = 0;

	void OnGUI(){
		GUILayout.Label("Time to bake textures: " + elapsedTime);
		if (GUILayout.Button("Combine textures & build combined mesh")){
			MB3_MeshBaker meshbaker = target.GetComponent<MB3_MeshBaker>();
			MB3_TextureBaker textureBaker = target.GetComponent<MB3_TextureBaker>();

			//These can be assets configured in editor
                        // or you can create them
			// on the fly like this
			textureBaker.textureBakeResults =
                                  new MB2_TextureBakeResults();
			textureBaker.resultMaterial =
                                  new Material( Shader.Find("Diffuse") );

			textureBaker.CreateAtlases();

                         //only necessary if your not sure whats
                         //in the combined mesh
			meshbaker.ClearMesh();
			meshbaker.textureBakeResults =
                                        textureBaker.textureBakeResults;
			//Add the objects to the combined mesh
	                meshbaker.AddDeleteGameObjects(
                            textureBaker.GetObjectsToCombine().ToArray(),
                            null);

			meshbaker.Apply();
		}
	}
}
Using An External Atlas Generator with Mesh Baker
Although MeshBaker does not directly support this it is not difficult to use a third party atlas generation tool with Mesh Baker. The MB3_MeshBaker component does not need a MB3_TextureBaker component, all it needs is the Texture Bake Result asset. You can create on of these assets yourself and populate. Try selecting this asset in the project to look at the fields it contains in the inspector. All you just need to populate is the “Materials” list and the “Prefab UV Rects” list
API
Mesh Baker was created by Ian Deane. Other assets by Ian Deane include:
- Fast Shadows
- Mesh Master
- Ramp Brush
- Crater Brush
Mesh Baker is available in the asset store.
Leave a Reply
You must be logged in to post a comment.